Saturday, July 16, 2011

Super Ultra High Power Telephoto Lens Hack

Last night was a full moon and it happened to be a very clear night. There were a couple stray clouds meandering across the night sky to which my dad alerted me and suggested I grab my camera. I grabbed my shiny new Nikon D3100 and headed out to grab some shots of the moon, but as I only had the kit 18-55mm Nikkor lens, I was not planning on any close ups. This is what I started expecting:


I make it outside just as the clouds are passing but grabbed a few pics anyway, as it was nice out and still looked cool. My dad mentioned how back in the day, people would go out and shoot entire rolls of film of the moon with it in different locations to use later in enhancing other pictures. That seemed pretty cool, but we discussed the miracles of the GIMP and other things with cut and paste editing. Anyway, the idea of actually looking at the moon came up and I mentioned how awesome it looked through my spotting scope. shortly thereafter I made a trip inside and grabbed my Gander Mountain 12-50x scope and a tripod. At 50x, the moon entirely filled the eyepiece of the scope with great detail.

Since the camera was still outside, I decided to see how well it worked if I just put the camera behind the scope and looked through it. It actually worked fantastically well. Though it was very difficult to hold still and keep the moon in the frame, I managed to grab a couple awesome shots such as the one below


Moon Hax


With the great success that that experiment led to, I promptly set about the task of making a more stable lens hack platform. For this platform, I planned on just using a board with some 1/4-20 bolts to hold everything in place and to allow the camera to be positioned up high enough so that it would be on axis with the scope. initially I had only placed a single hole for a bolt for each the scope and camera, but found that I needed to adjust the distance between them more than I had anticipated, so one of the holes became a slot with the help of a 1/4" router bit and the drill press (I was far too impatient to bother setting up the router).

To provide a way to attache the mount to my tripod, I drilled a 3rd hole and counter bored it slightly and pressed a 1/4-20 nut into it. This later proved to not work so well as it was terribly not balanced, so I later adjusted it. When replacing it, I also  filed some notches into the bolt and Guerrilla Glued it into place. Hopefully the notches and expanding action of the glue will keep it snug this time.


When it all gets put together, it looks something like this:


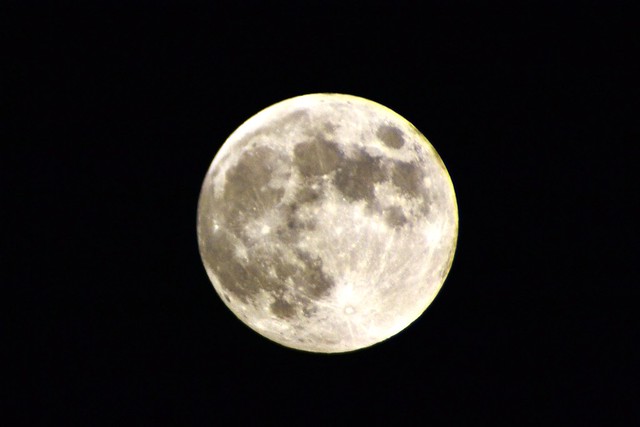
 and can take pictures like these:

mailbox ~300'

Green thing ~90'


Overall, though the image quality is nowhere near fantastic and does not fill the whole sensor, it is still quite excellent for the price. It does not respond well with small apertures as there is major vignetting, which is improved greatly with wider apertures. There also is a lot of chromatic aberration present, especially if the camera and scope are slightly off axis. I believe that CA is still present when using the scope on ts own as it really isn't designed for this use... In the final pic of the moon above, I removed the red and blue channels and desaturated it, to remove large amounts of CA

But yeah, reasonable very long lens for maybe $2 in parts(or entirely scrap if you have a proper basement)? Sounds great to me =]

These few pics are hosted in 14.2MP at my Picasa
also, check out my Flickr... for some more interesting stuff but limited hosting and such...

Monday, February 21, 2011

Arduino Stroboscope

I was watching TV a bit ago and playing with my model wind turbine from my fluids class and was having a good time playing with aliasing. From there, the obvious answer to my problem that I didn't really have was to build a stroboscope. This little tangent has resulted in a stroboscope capable of measuring rotational speeds from 577 to 30,000 rpm.


Before I get too far into the code and such, a brief description of a stroboscope is in order. A stroboscope is essentially a pulsed light at a known frequency. when the frequency of a rotating object matches that of the stroboscope, it appears to stand still. It is possible for the object to be moving at a multiple of the strobe frequency as well. for more info check out the interwebs or something.


Thursday, February 17, 2011

6 channel serial LED Dimmer w/ Arduino

While continuing research for senior project we came across the LanBox DMX controller. It essentially takes a hex string and converts it to DMX. Since the LanBox is expensive and we only have one, I wanted to make something that could function similarly for prototyping applications.

What I came up with was using all 6 PWM pins on the Arduino and assigning them intensities through a serial string beginning with "A"

Since allowable intensities varied between 0 and 255 I had the code break down the serial string into chunks of 3 characters. I dont know a whole ton about hex, but it would have been ideal.

So if you send the string "A255000255000122200"
channel intensities would be
  1. 255
  2. 000
  3. 255
  4. 000
  5. 122
  6. 200

The idea is that a whole string of all the instrument (LED) values would be sent in some sort of loop to control dimming operations so that minimal to no code would have to reside on the dmx device improving reliability of the system.

In the meantime, this is the code that I have come up with ideally I would like to be able to send information only on certain channels with some sort of identifier.

The exact code that is currently in use can be found after the break

Saturday, February 5, 2011

DIY temp controlled fermentation chamber from broken fridge.

(reposted from last year from Homebrewtalk)

So a couple weeks ago, my fridge broke. Since I live in an apartment, the landlord had a new one brought
3 flights of stairs by his crew. I saw an opportunity in this as it took those guys around 20 minutes to bring the new one up. I asked them if I could keep it and they said "sure go ahead." I now had this dead fridge out in my 30ยบ sun room that I needed to get working on. I already had a thermostat in my closet, but the closet has been proving too leaky to keep at a reasonable temp. So it worked out really well. 
 Running
Here's what I did. 

Friday, February 4, 2011

Closed loop evaporative wort chiller


Reading the forums, I noticed that a lot of people were feeling somewhat guilty about all the water that they go through chilling their beer. As a good engineer interested in thermodynamics, I decided that I would take a shot at tackling this problem. Since many of the people with the water issues were in warm climates with fairly warm water temperatures tended to be in the southwest, I decided that an evaporative chiller would be the easiest and most effective way to go.

My cooling system consists of the following parts connected in this order
1: High head pump (115' head, 650GPH))
2: Wort chiller (I used an immersion chiller but a counterflow or other isolated chiller would work as well)
3: Spray head (constructed out of PVC, 1/8" hole with flat surface to disperse water, I used a 14 Ga. copper wire)
4: Spray Column (used some circular duct from an old furnace install)
5: Reservoir (An old trash can in my case, I cleaned it, but it doesn't really matter)

The idea is to pump the water through the chiller and disperse it into a fine mist while moving massive amounts of air to evaporate as much water as possible. Each pound of water evaporated removes about 960 BTU from the environment in the form of a temperature drop. With evaporative cooling, it is possible to cool the working fluid down to the dew point so that means you can cool below the outside temperature which can be very significant in dry climates.

I have some more pics and details of the rig following

Prototype for Arduino control of Midi Dimmer pack


For my ME Senior Project this year, I have been assigned to work with the Galena Historical Society in Galena, Illinois. My Group has the task of designing three different exhibits for the museum. One exhibit involves the creation of a holographic type projection of Ulysses S. Grant and his wife Julia. The second exhibit is an interactive exhibit designed to highlight the famous Peace in Union painting, which will possibly be using this Arduino control, and a third hypothetical exhibit consisting of a rotating/translating display case. Write ups or more details on the display case and holographic projection may be posted later.


For the illuminated painting, the idea is to have a touchscreen with a digital version of the painting. Guests will be able to click on the individual figures to learn more about everyone contained in the painting. When a character is selected, they will be highlighted on the actual painting on the wall either by the addition or subtraction of lighting. Users will be able to navigate through various layers of details for each individual as they see fit, with the lighting following along.

Wednesday, October 13, 2010

Death Ray (automatic smoke ring cannon)

While working on senior project the other day, I decided I wanted to build a death ray. I'm not quite sure why exactly, but it seemed like a spectacular idea. I have built smoke ring launcher things in the past but they were always operated by hitting the back membrane or whatever. This time, I thought it would be cool to use a speaker cone as the back diaphragm instead of the bottom of a garbage can or something.

Lucky for me, back in high school I managed to obtain a couple busted old 15" PA drivers and had built a very rough prototype subwoofer enclosure for it. I was feeling adventurous at the time so I built it with a passive radiator. I built it like crap so it sounded about the same so it was sitting in my basement all alone. The hole where the passive radiator went was quite useful as no holes needed to be cut in the enclosure. I took out the driver and flipped it around to expose the full surface area of the cone to the working side.

With the driver mounted, all that was left was to cut a hole in a piece of cardboard on the front and to get some power to the driver. I started off with a hole the size of a masking tape roll cut centered in a square of cardboard. I generated some waveforms in audacity to feed the driver through an old amp I had laying around. I found that using the top half of a sine wave at a high amplitude worked best. Also, having a reasonable amount of space between pulses helped clean up the smoke rings. I finally settled on using a 40hz wave with spacing between 0.2 and 1 second.


After playing around with that a bit, I cut a final orifice in a piece of 1/2" ply the size of a Minwax can. In all it worked fairly well and shit smoke rings about 12'. It probably would shoot them farther, but it was somewhat windy out and there was a fence in the way. I thing it would be awesome to use propane instead of smoke and shoot flaming rings of fire, but it may not be the smartest thing to do.

Here is a quick video of it in action, it sounds funny, but my little camera just couldn't pick it up properly.

While I had the sub and tone generator out, I decided to test for the brown note. Overall, it didn't do much, but I really felt funny afterward